Slide instructions
SPACEBAR to move forward through slides.
SHIFT & SPACEBAR to move backwards through slides.
LEFT ARROW & RIGHT ARROW to move through sections.
ESC to see overview and ESC again to exit.
F to enter presentation mode and ESC to exit.
Using Chrome’s accessibility tree for manual testing of HTML and ARIA
Before diving into Chrome's accessibility tree, let’s look at three concepts associated with HTML elements:
- Accessible names
- Roles
- Accessible descriptions
Accessible names
Accessible names are short text strings that provide assistive technology users with a label for the element.
Accessible names convey the purpose of the element.
They also distinguish the element from other elements on the page.
So, each accessible name should be unique.
Roles
Almost all HTML elements have a ‘role’.
These roles are used to define their purpose - especially for assistive technologies.
The <input type="radio"> has the role of radio.
The <a> element has a role of link.
Accessible descriptions
Sometimes, HTML elements need additional context - as well as their short accessible name.
For example, instructions or error messages associated with form controls.
If applied correctly, this additional information is referred to as an accessible description.
How names, roles and descriptions are announced
Let’s look at a simple form control and its associated label:

<!-- Accessible name -->

<label for="aaa">Address</label>
<span id="bbb">Include full street address</span>
<input id="aaa" type="text"
  aria-describedby="bbb" required>
<!-- Role -->
<label for="aaa">Address</label>
<span id="bbb">Include full street address</span>
<input id="aaa" type="text"
aria-describedby="bbb" required><!-- Accessible description -->
<label for="aaa">Address</label>
<span id="bbb">Include full street address</span>
<input id="aaa" type="text"
aria-describedby="bbb" required><!-- State -->
<label for="aaa">Address</label>
<span id="bbb">Include full street address</span>
<input id="aaa" type="text"
aria-describedby="bbb" required>Screen readers announce element properties in the following order:
(The following examples have been simplified to explain the overall concepts)
Windows / NVDA and JAWS
- Accessible name: ‘Address’
- Role: ‘Edit’
- State: ‘Required’
- Description: ‘Include full street address’
OSX / VoiceOver
- Accessible name: ‘Address’
- State: ‘Required’
- Role: ‘Edit text’
- Description: ‘Include full street address’
But how do these screen readers access all of this information? Via the accessibility tree.
What is the accessibility tree?
The accessibility tree is a simplified version of the Document Object Model.
The accessibility tree consists of information about specific HTML elements.
This includes:
- Name
- Role
- Description
- States (Invalid, required, checked, expanded)
- Value (Added or chosen by the user)
This information is passed on to assistive technologies so that they can understand, navigate and interact with web documents.
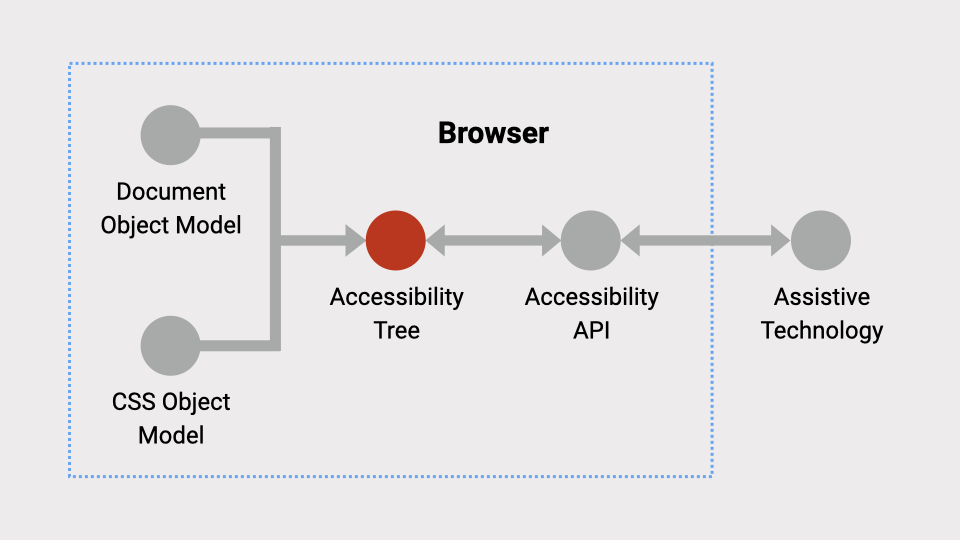
Each browser creates its own version of the accessibility tree. They also use their own Accessibility APIs.
This means assistive technologies may have slightly different experiences in each browser.
Why use Chrome’s accessibility tree?
The Chrome browser has an excellent function called the ‘Computed properties’ panel.
This panel presents a range of accessibility information in one location.
How to access Chrome’s accessibility tree
Accessing activity 1:
Go to the All about mammals page.
Step 1: Opening Chrome Developer Tools
- Right-click anywhere on the page.
- Select ‘Inspect’.
- This will open Chrome Developer Tools.
Alternatively, you can use:
- Windows: Control + Shift + C.
- Mac: Command + Opt + I
Step 2: Finding the ‘Accessibility’ tab
- The ‘Elements’ tab will be active by default.
- This shows the DOM tree and the ‘Styles’ panel.
- The ‘Accessibility’ tab is to the right of ‘Styles’.
- You may need to click the ‘More tabs’ icon.
Step 3: Select the ‘Accessibility’ tab
- Select the ‘Accessibility’ tab.
This tab displays:
- ‘Accessibility tree’ panel
- ‘ARIA Attributes’ panel
- ‘Computed Properties’ panel
- ‘Source Order Viewer’ panel
We will spend most of our time exploring the ‘Computed Properties’ panel.
Diving into the accessibility tree
1. Inspect the ‘Find out more’ link
In the Computed Properties panel, find the element’s name and role.
Answer
- Name: Find out more
- Role: link
All important elements must have names and roles so assistive technologies can understand them.
(We will look at accessible names in detail soon.)
2. Inspect the image
In the Computed Properties panel, find the element’s name and role:
Answer
- Name: A common wombat standing on the forest floor
- Role: image
3. Inspect the ‘Full name’ <input>
In the Computed Properties panel, find the element’s name and role:
Answer
- Name: Full name
- Role: textbox
4. Inspect the ‘What are mammals’ heading
In the Computed Properties panel, find the element’s role and level:
Answer
- Role: heading
- Level: 1
5. Inspect the ‘Land mammals’ table
In the Computed Properties panel, find the <table> element’s name and role:
Answer
- Name: Land mammals
- Role: table
Inside the table, all essential elements also have roles:
Answer
<tr>role = row<th>role = columnheader<td>role = gridcell
6. Inspect the ‘Vombatus’ content
Does this element provide any information in the Computed Properties panel:
Answer
- Accessibility node not exposed
Some less important elements are not exposed in the accessibility tree.
7. Inspect the ‘Phone’ <input>
In the Computed Properties panel, find the element’s description:
Answer
- Description: Include area code
Descriptions are used to provide additional information for some elements.
(We will look at accessible descriptions in detail soon.)
8. Inspect the ‘Email’ <input>
Is this element defined as required in the Computed Properties panel?
Answer
- Required: true
This tells assistive technologies that the form control is required and must be filled in before submitting the form.
9. Add text into the ‘Email’ <input>
Does the element now have a value in the Computed Properties panel?
Answer
- Value: "abc@com.au"
This tells assistive technologies what the user has added to the form field - allowing the user to review the information before submitting the form.
10. Select an option from the dropdown
Select ‘Aardvark’ from the ‘Favourite mammal’ dropdown. Does the <select> element now have a value in the Computed Properties panel?
Answer
- Value: "Aardvark"
11. Check a checkbox
Check ‘Yes’ from the ‘Bats’ checkbox group. Does the checkbox now have a checked status in the Computed Properties panel?
Answer
- Checked: true
This tells assistive technologies that the form control has been checked.
12. Click the ‘Submit’ button
This will create some fake form errors. Inspect the ‘Phone’ <input>. Is this element defined as invalid in the Computed Properties panel?
Answer
- Invalid user entry: true
This tells assistive technologies that the form control is currently invalid and needs to be resolved.
Lots of properties
There is a wide range of possible properties that can be presented in Chrome’s accessibility tree, depending on the element:
Name: [ accessible name as a text string ]
Role: [ pre-defined list of roles ]
Description: [ description as a text string ]
Value: [ current value as a text string ]
Required: true | false
Expanded: true | false
Checked: true | false
Disabled: true | false
Described by: [element #id]
Labeled by: [element #id]
Using ARIA to alter the accessibility tree
ARIA is a set of custom HTML attributes that add information to the accessibility tree.
This information can be used to help assistive technology users understand the name, role or state of elements.
ARIA is essential when the name, role or state of an element is not natively available.
Accessing activity 2:
Go to the Testing ARIA page.
We can see how ARIA attributes affect Chrome’s accessibility tree.
1. Testing role="button"
Check the <div> element’s role in the accessibility tree:
Answer
- Role: button
We can use ARIA to add semantics to an elements that have none.
2. Testing role="combobox"
Check the <input> element’s role in the accessibility tree:
Answer
- Role: combobox
We can use ARIA to improve the semantics of elements.
3. Testing aria-expanded
Check the <button> element’s ‘Expanded’ state in the accessibility tree:
Answer
- Expanded: true
We can use ARIA to inform assistive technology users when an element is expanded or collapsed.
4. Testing aria-invalid
Check the <input> element’s ‘Invalid User Entry’ value in the accessibility tree:
Answer
- Invalid User Entry: true
We can use ARIA to inform assistive technology users when an element is currently invalid.
5. Testing aria-label
Check the <button> element’s name in the accessibility tree:
Answer
- Name: Dismiss
We can use ARIA to improve the accessible names of elements.
6. Testing aria-live
Check the <div> element’s ‘Live region’ value in the accessibility tree:
Answer
- Live region: polite
We can use ARIA to inform assistive technology users that a region may contain dynamic content that may change over time.
Chrome’s accessibility tree can be used to show you any ARIA that has been applied and how it will impact HTML elements.
Reviewing accessible names in the accessibility tree
As we saw before, Chrome’s accessibility tree shows the accessible name generated for each element.
The ‘Computed Properties’ panel shows us:
- All possible names (from strongest to weakest).
- Where the names come from (where relevant).
- Which one wins.
This is very helpful when reviewing the accessibility of elements.
Accessing activity 3:
Go to the Input accessible names page.
The examples on this page show very poor accessible naming practices. It is for educational purposes only.
Example 1
The <input> element has five accessible names applied. But which one wins?
- An
aria-labelledbyvalue of ‘Cat’ - An
aria-labelvalue of ‘Dog’ - A
<label>value of ‘Fish’ - A
titlevalue of ‘Rabbit’ - A
placeholdervalue of ‘Fox’
The <input> element should have an accessible name of ‘Cat’ via the aria-labelledby attribute.
- The
aria-labelledbyvalue of ‘Cat’ wins Anaria-labelvalue of ‘Dog’A<label>value of ‘Fish’Atitlevalue of ‘Rabbit’Aplaceholdervalue of ‘Fox’
Example 2
The <input> element should have an accessible name of ‘Dog’ via the aria-label attribute.
- No
aria-labelledbyvalue present. - The
aria-labelvalue of ‘Dog’ wins A<label>value of ‘Fish’Atitlevalue of ‘Rabbit’Aplaceholdervalue of ‘Fox’
Example 3
The <input> element should have an accessible name of ‘Fish’ via the <label> element.
- No
aria-labelledbyvalue present - No
aria-labelvalue present - The
<label>value of ‘Fish’ wins Atitlevalue of ‘Rabbit’Aplaceholdervalue of ‘Fox’
Example 4
The <input> element should have an accessible name of ‘Rabbit’ via the title attribute.
- No
aria-labelledbyvalue present - No
aria-labelvalue present - No
<label>value present - The
titlevalue of ‘Rabbit’ wins Aplaceholdervalue of ‘Fox’
Example 5
The <input> element should have an accessible name of ‘Fox’ via the placeholder attribute.
- No
aria-labelledbyvalue present - No
aria-labelvalue present - No
<label>value present - No
titlevalue present - The
placeholdervalue of ‘Fox’ wins
The sneaky title attribute
As we saw before, the title can be used to provide an accessible name for some elements.
However, it is very weak and will often be beaten by other methods.
But the title is very sneaky!
If it loses the accessible name battle, it will try to win the accessible description battle.
Accessing activity 4:
Go to the Testing the title attribute page.
Example 1
The title is the only accessible name option and will be used as the accessible name.
<input type="text" title="Add your name">- Name: "Add your name" - via the
titleattribute - Description: Not present
Example 2
There is a <label> present, so the title will not be used as the accessible name.
However, as there is no other description available, the title will be used as the accessible description.
<label for="name">Name</label>
<input id="name" type="text" title="Add your name">- Name: "Name" - via the
<label>element - Description: "Add your name" - via the
titleattribute
Example 3
There is an aria-describedby present, so the title will not be used as the accessible description.
In this example, the title has lost both battles - for accessible name and description.
<label for="name">Name</label>
<span id="aaa">Include your full name</span>
<input id="name" type="text" title="Add your name"
aria-describedby="aaa">- Name: "Name" - via the
<label>element - Description: "Include your full name" - via the
aria-describedbyattribute
Too good to be true?
By now, you think that the Chrome accessibility tree is amazing.
However, like any tool, it has strengths and weaknesses.
For example, Chrome does not accurately define required states for some of the more recent form controls.
Accessing activity 5:
Go to the Testing the required attribute in Chrome page.
If we inspect the <input type="email">, the accessibility tree correctly displays:
Required: trueInvalid user entry: false
If we inspect the <input type="search">, the accessibility tree displays:
Required: Not exposedInvalid user entry: false
And if we inspect the <input type="date">, the accessibility tree incorrectly displays:
Required: Not exposedInvalid user entry: true
Chrome’s accessibility tree is incorrectly displaying information for a range of elements.
What does this tell us?
While Chrome’s accessibility tree is very useful, it does not replace rigorous accessibility testing.
And it does not replace screen reader testing either.
Wrapping up
If you’ve never used Chrome’s accessibility tree, hopefully, this session will give you the confidence and knowledge to give it a go!